1 November

And now....the annual Halloween costume reveal! 

halloween 14

halloween 17

halloween 10

This year, we enjoyed the company of a 1950's sock hopper, a fire figher, a black cat, and the fire fighter's dalmatian puppy.

We made all of these costumes except for the fire fighter, which was from our dress up bin and James had settled on being it for Halloween months ago. It was my first time not sewing anything at all for a costume and a little bittersweet, but he was excited, so that's all that matters. 

halloween 18

halloween 7

halloween 5

halloween 16

We made the skirt and a net petticoat for the sock hopper costume using Butterick 4113.

halloween 3

I'm not sure how Elisabeth thought of this costume, but it was fun for me because I once had a gray poodle skirt costume that my mom made for me. 

halloween 19

The black cat costume was made using Simplicity 9050, a 1970 pattern.

halloween 1

halloween 6

I love how Fiona is so certain about what she wants to be. Once she decided on black cat, it was settled, and she was so excited about it.

halloween 2

John's dalmatian costume was from Butterick 3050, and it was the one that Elisabeth did most of the sewing on. She even did the zipper! She has watched me sew every Halloween costume over the years (and we've made quite a few similar animal-style ones, including this year's black cat), and she did a great job. 

halloween 8

It was pretty chilly outside and although Elisabeth opted to suffer for the sake of the photoshoot before putting her sweater on, John was not that into it and we couldn't get him to smile! Shortly after this, he was asleep. 

halloween 13

We had a fun Halloween, visiting some neighbors from our old neighborhood and some long-time family friends (whose daughters used to babysit baby Elisabeth when they were teenagers -- they are now all over 21!) before coming back to our neighborhood for some trick-or-treating. It was super fun. Overall (despite my injury to my backside), this was the most relaxed Halloween I've enjoyed in at least 5 years, so that was nice, too. 

See you tomorrow!

5 August

The week before John was born, my friend Meghan came over and we made a little stack of diaper doublers for the baby. She had several lovely fabrics, including a beautiful, soft velour we used to go against baby's skin. It was such a nice gift, both in the usefulness of the doublers and in the time we spent together working on them.

Well, fast forward six weeks, and Mr. Heavy Wetter needs more doublers! We're still using the original cloth diapers we purchased many years ago, but doublers take more of a beating in the wash and we don't have many left. 

So yesterday I decided to make a few more, using just materials I had on hand. I made four in the span of about an hour, during one of John's (few) naps. (And I took a break to enjoy a Paloma, too.)

soaker making

Two of them are made using two layers of hemp fleece (I had about half a yard of it that I'd been given as a sample about 6 years ago), one layer of terry cloth from an old washcloth (stained with watercolor paints!), and one layer of cotton jersey from an old crib sheet. The other two are similar, but use a layer of wool interlock that was given to me when I had Fiona (for making diaper covers, which I still haven't made) instead of the terry cloth. (The wool has been machine washed and hasn't been treated with lanolin, so it should absorb rather than repell moisture.)

I layered them with hemp fleece on the bottom, followed by either terry or wool, then a second layer of hemp, and finally the cotton jersey on top. That jersey is so soft, it will be lovely against his skin. I serged them, but if you don't have a serger, a zig-zag stitch and then a close trim would do the trick. 

et voila!

And all finished! (Not pictured: my cocktail.)

I'm so excited to see how these perform!

In other diapering news, here are a ton of pictures of baby John modeling the wrap I knitted for him. These are from a couple of weeks ago. He can still wear it, but just barely. He's approaching 12 pounds already! (The blanket you see here was knitted for him by my mom.)

wrap_7

wrap_1

wrap_2

wrap_3

wrap_4

wrap_5

wrap_6

3 January

poinsettia

ornament

cards

It's still officially Christmastime around these parts. We keep the decorations up until after Epiphany (I usually surprise my husband by taking them all down on one of his first days back to work after break), and this first week of the new year is quiet for us. We've been reading, playing Christmas songs on the piano (a little me, mostly Elisabeth now), and playing with our gifts. I wrote and sent our Christmas cards -- although late, I figured it was a necessity since we moved this year.

dolls

I ended up making one major gift and a few smaller ones this year (more on those later). But what turned out to be the big handmade project this year was something I hadn't planned on doing. A few days before Christmas, Daisy (our puppy) mauled Elisabeth and Fiona's dolls. After I lot of finger crossing and breath holding, I plunged in and repaired their little faces. My repairs were pretty successful, and inspired me to try and clean up all three dolls and make them all new clothes for Christmas. It was a last-minute project and very time consuming. Looking at this picture, I realize Claire and Peter (the older dolls) could've gotten even cleaner, but it was a huge improvement still. Claire got new hair, and in addition to the plastic surgery on faces, they all needed other minor repairs. I was so excited to set them out for the children to find on Christmas morning and they were so happy to see their dolls so freshened up. It was wonderful.

I'm looking forward to a few more quiet days before plunging back into the normal schedule on Monday.

(PS: We did have a little snow -- just an inch or so -- on Christmas morning. It was just what I'd hoped for.)

14 November

I guess it's inevitable that once I allowed myself to miss one day this month, I'd miss another. You know, ever since last week when we were driving Daddy all over the world, it seems like our pace hasn't evened back out and I've been longing for some quiet days at home. Today we finally took that day and it was so worth it.

Untitled

Untitled

I made some homemade deodorant, using this recipe. This is the only recipe I've tried, as my friend Claudia went through a period of trial and error with a few different deodorant recipes and said this one was the best. I have never had any complaints about it. To answer some questions I anticipate you might have:

-Does it work? Yes, it works great as a deodorant. It is not an antiperspirant, though I think the baking soda and arrowroot powder do absorb some moisture. If you are used to antiperspirant, this is a different experience. You will notice some wetness. I switched from antiperspirant to plain deodorant over 10 years ago because I learned that the reaction of the chemicals in antiperspirant with sweat is what causes yellow stains on clothing. Since making that switch, I haven't had a problem with yellow stains, so I think that's the definite culprit. All that to say, if you try this, you will notice some wetness but it takes care of odor.

-How often do you have to apply it? Once a day is fine for me. Maybe as your body adjusts, you might need to reapply, or on really hot days. But it's very effective.

-Does it irritate your skin, or get powdery when it dries out? I have extremely sensitive skin and this particular formula has not given me any trouble over the approximately 18 months that I've been using it. I have not noticed it becoming powdery.

-How much does it make? This recipe is enough to fill two two-ounce jars, which I got at the health food store in the essential oils aisle. Elisabeth uses deodorant now(!), so it's perfect: one for her, one for me. Though my husband is wary to try it, I kind of presume I'll mix up a more masculine-smelling batch for James when he gets bigger. Because I feel like, why go the route of chemicals if you don't absolutely have to?

a return to stitching

sunny day

Other than that, I picked my stitching back up after a two-week hiatus (see? doing extra at the beginning was wise), and we just hung out for most of the day until it was time for swim team. It was a much needed day of rest.

4 November

making the cowboy shirt

my yarn

These photos are from last week, from when I was working on costumes. I was looking through my photo files and thought they were pretty on this dreary Sunday afternoon.

End of Daylight Saving Time. I love it and hate it. Right at this moment, I kind of hate it. This morning, driving to the second day of the swim meet, I kind of loved it, since we drove there as the sun was rising rather than in the pitch black like yesterday. We are going to church this evening, which will interfere with my usual enjoyed early bedtime reset on the end of Daylight Saving Time. But actually, that's fine, because my children have been falling asleep pretty early, even considering our slightly later schedule lately. Most nights they've been asleep by 8:15, even with a later dinner. 

I cast on Elisabeth's sweater on Friday, and I'm desperately going to try to finish it by next week. We'll see. James's still needs sleeves but I discovered I don't have double pointed needles in the right size and I keep forgetting to get some. I know I could do the magic loop method with my circular needle, but I don't like the results I get. It might because I knit so loosely, but I end up with terrible laddering. Anyway, that's on the agenda this week. I have so many other finished knits that need to be photographed and shared, that's my goal for this month.

That's about it for this random weekend post. See you tomorrow!

1 November

happy halloween

I hope you all had a lovely, festive Halloween. Halloween has long been a favorite of mine ... autumn being my favorite season, and all the merriment and make-believe. I'm usually able to look past the scary/gory part, although a bit of an innocent scare is also always fun. 

Anyway, I meant to be here all week, but of course, I procrastinated with the costume making, so I was too busy. Also my husband was out of town for several days and that added to some additional schedule juggling. Today was a day for decompressing, hence the very late post! 

I'm planning to post every day in November again, as has been my habit the last few years. It's a fun challenge. I will probably be posting at different times of the day due to our schedule. I'm not a great blogger at writing a post the night before and publishing it the next day. I usually just sit down, write, and publish a post. So just keep an eye out, I don't know when they'll be going up, but I promise there will be one each day this month! I've never failed yet!

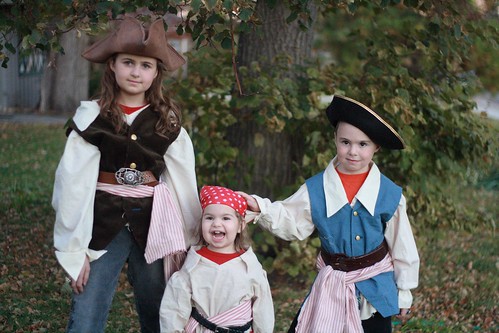
Anyway, on to the Halloween costumes, since I know that's the subject of curiosity for some of my readers! 

IMG_2517

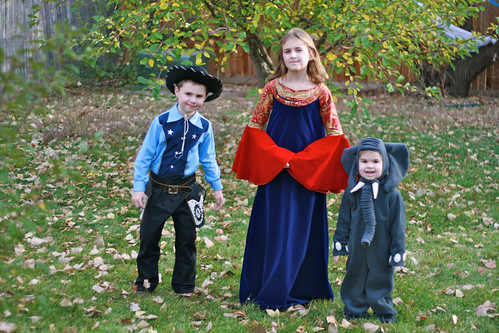
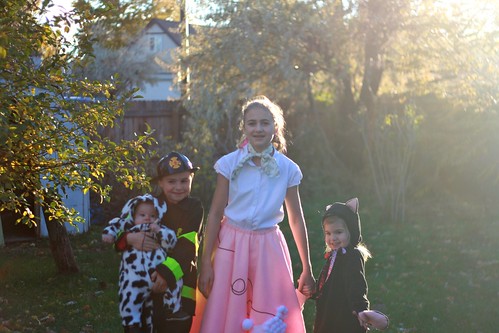
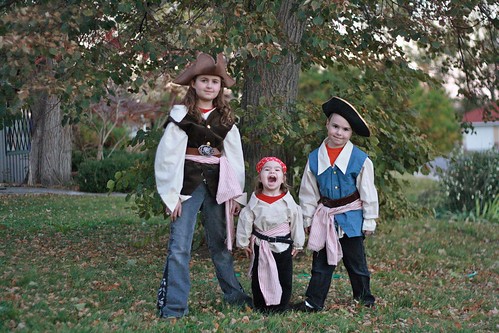
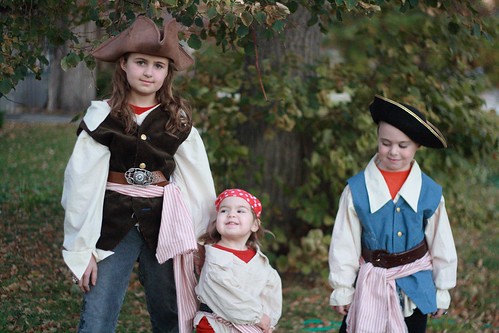
This was the first year since we became a multiple child family that we didn't have themed costumes. I have to admit that it made me sad; I was hoping they'd do it a few years longer. But alas, they all had very distinct ideas this time. 

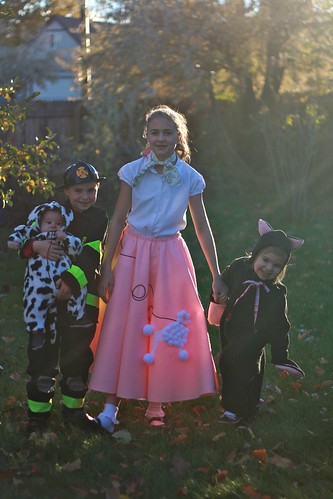
Having read The Lord of the Rings this year, and now being totally obsessed with it, Elisabeth chose to be Arwen. James is in a huge cowboy phase right now, so he chose to be a cowboy, although there was a moment there where he wavered and almost agreed to be Gandalf. At which point, we could've gone with a Lord of the Rings theme. But, in the end, cowboy won out. And Fiona chose to be an elephant. 

More about the costumes:

Untitled

sleeve detail

train, also a glowy lens flare

neckline detail

neckline detail

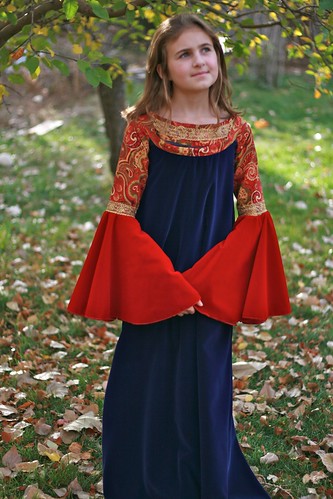
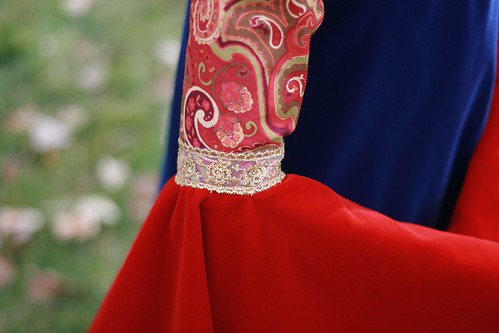
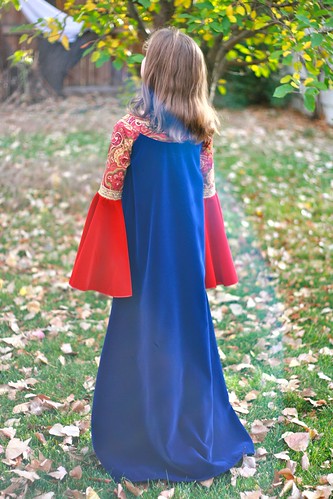
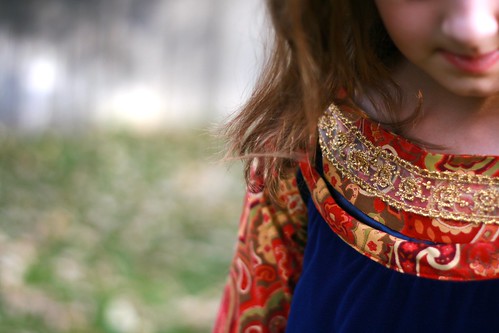
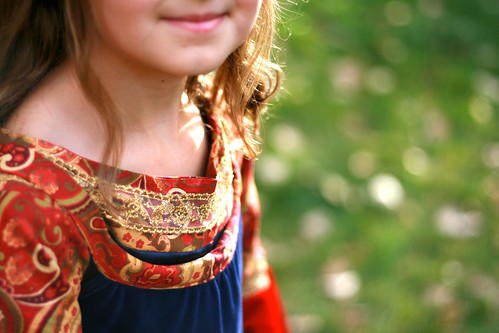
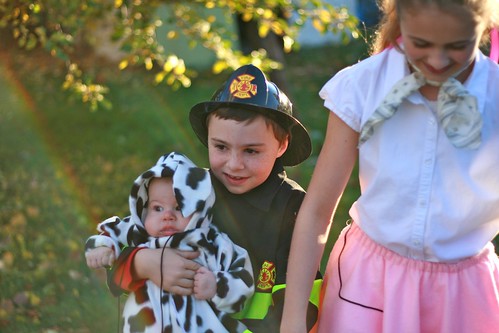
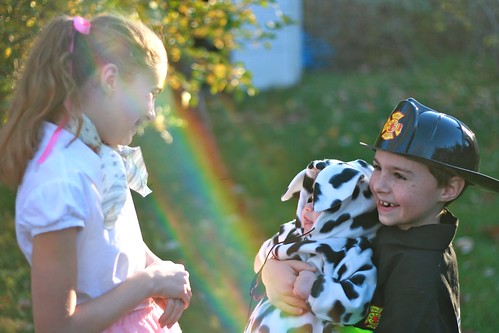
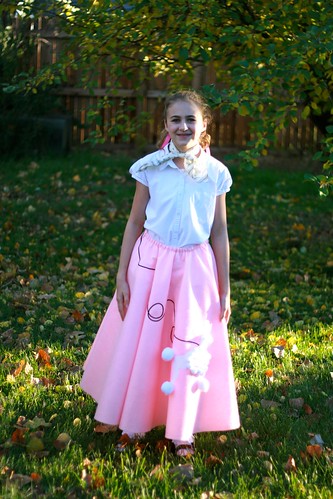
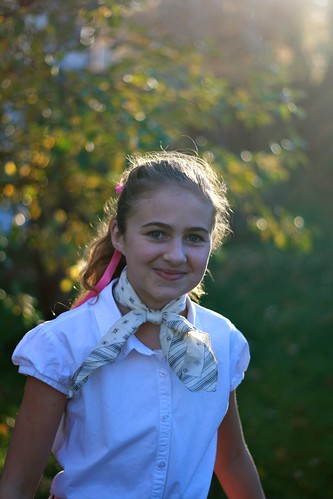
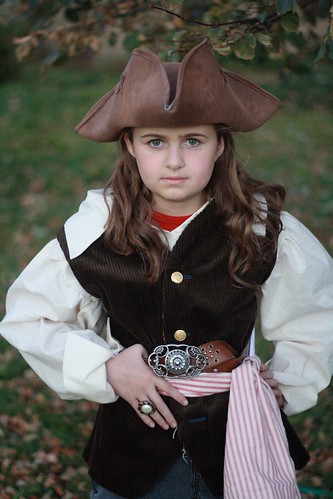
For the Arwen costume, we decided to go with the "Blood Red" gown because it seemed to be the most memorable of the Arwen costumes from the movies. Back when the movies were released, there were commercial patterns to make copycat dresses, but they only came in adult sizes, and though there were plenty of them out there on Etsy and eBay, there's no way that the shape of a dress meant for an adult's curves would have fit my 65-lb, 5' tall 10-year-old. I decided rather than trying to make another princess dress and just making it the colors of the Arwen dress, that I'd do some research and try to come up with my own design. I discovered that there are tons of people out there who make costume replicas and I was able to get a lot of information about how to construct the dress. This site in particular was extremely helpful. I ended up making a basic raglan sleeve dress using satin and cotton paisley (with velvet sleeves, which I made smaller due to cost and practicality), and then cut away the top and designed a separate yoke piece. Then I made an overdress (like a jumper) out of blue velvet. Once I actually figured out what I was going to do, I just dove in and did it and in the end, the costume only took two relatively short sessions. I'd say I spent about 5 hours total on it, once the conceptualization was over. I am extremely excited about this costume, as was my little Tolkien fan! She is already breathlessly telling everyone we know that she is going to see The Hobbit in the theater when it comes out. :)

Untitled

Untitled

Untitled

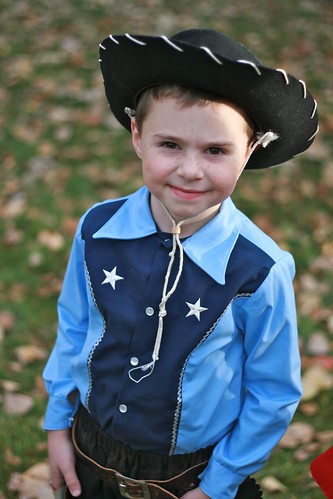
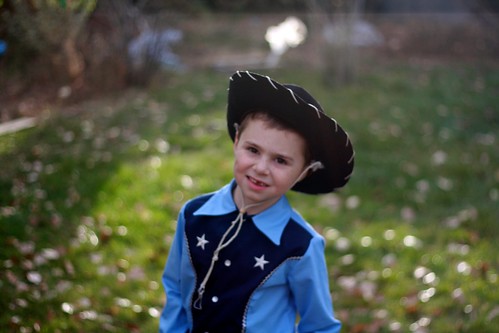
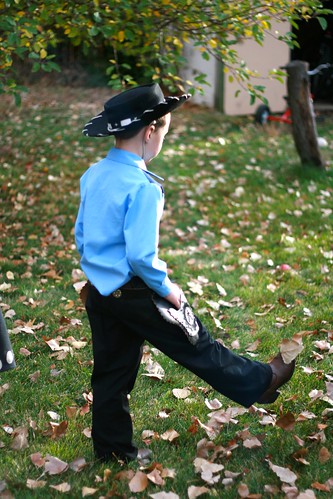
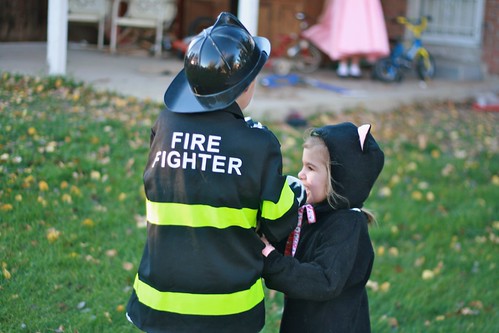
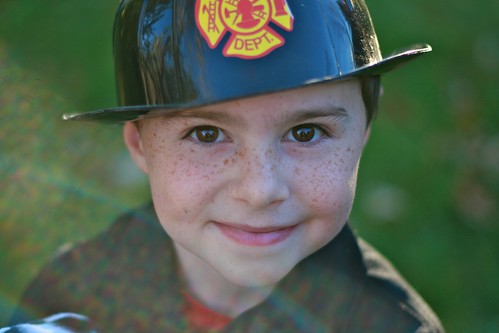
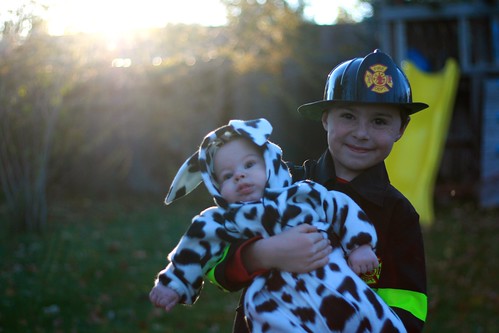
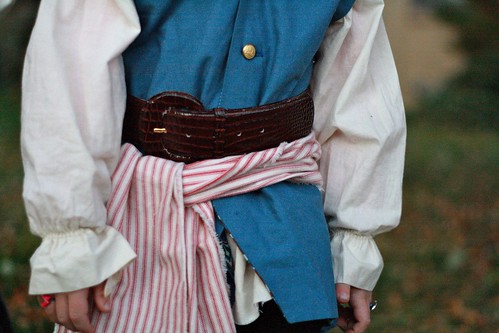
After the slight drama of designing the Arwen costume, James's costume seemed easy in comparison. I found a vintage cowboy pattern on Etsy (Simplicity 5332), and went from there. He liked the picture on the front of the envelope with the more "sheriff"-looking cowboy, so we used the same basic colors and look. When it came to finding a cowboy hat and holster that had the right look, we really encountered a lot of trouble. We went to store after store last weekend and came up completely empty handed. In the end, my husband found the hat and holster at an antique shop! They were a little bit pricy, but not crazy expensive, and in the end they were perfect for the costume. Since his costume was extremely affordable to sew (only three pieces of plain cotton fabric, plus the iron-on stars -- I had everything else on hand), I felt OK spending a little bit extra on his hat and holster. I think it's funny that he used the holster as pockets since he didn't have any guns!

Untitled

Untitled

Untitled

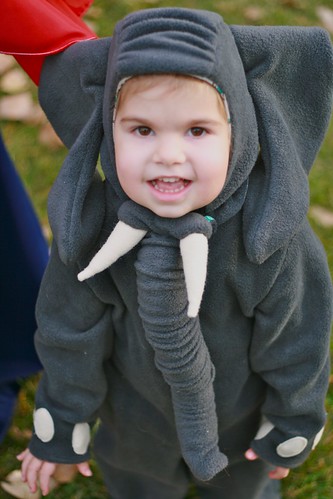
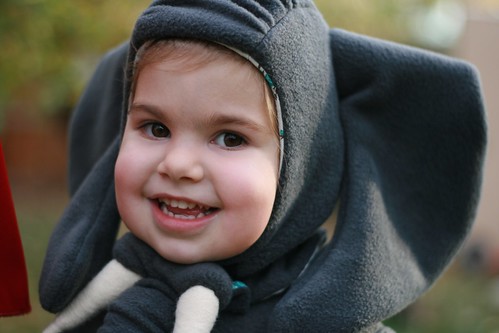
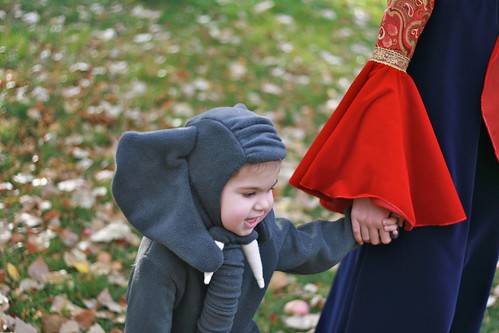
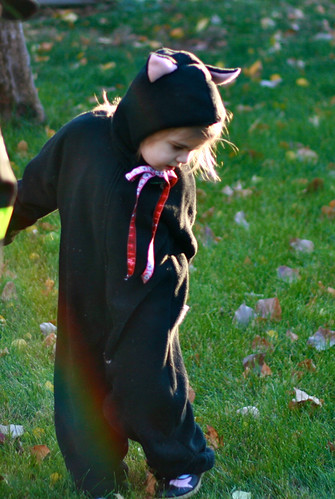
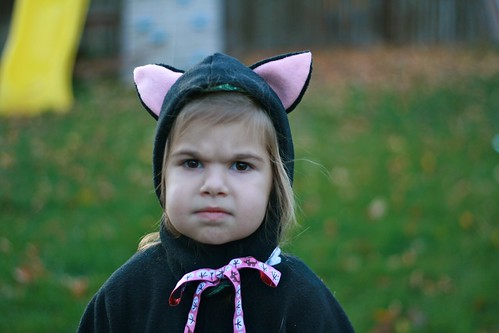
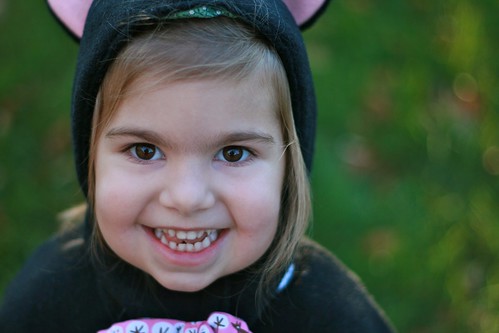
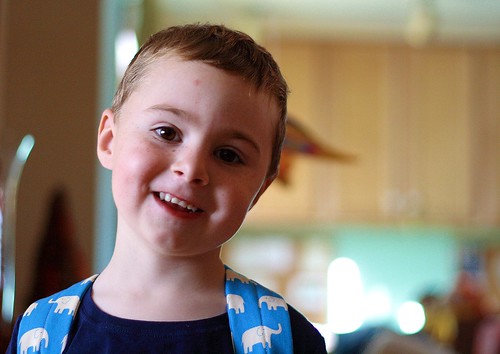
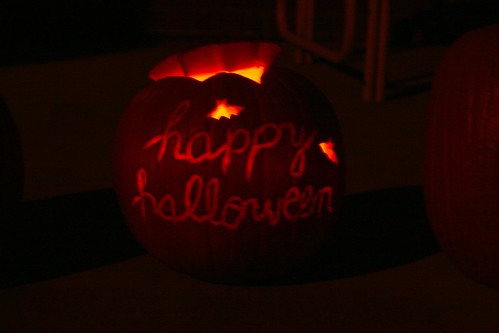
Fiona was all set to wear the ladybug costume that I made for Elisabeth when she was 3 1/2. That was fine with me. But occasionally, she'd bring up the idea of being an elephant (her favorite animal), and at the end of last week, I looked at her and just realized that this was her year to be an elephant. I knew she wouldn't want to be one next year at 4 1/2, and anyway, most of the good elephant patterns only come in toddler sizes. So on Saturday, I went and bought some 50%-off gray fleece and a zipper, and decided to make the elephant. Mondays are my teaching day and generally busy for us, so I had to wait until Tuesday to start. Since we were also having our friends over for our annual pumpkin carving party that night, I had to cook and get the house ready, too, so I was only able to work on the costume for a couple of hours on Tuesday. On Wednesday, after running some errands, I spent about 3 1/2 to 4 hours working on it, and I finished it in plenty of time to take pictures. Although I didn't want to be so last-minute on the costumes this year, I am so glad I made this costume. She was my cutest and most enthusiastic trick-or-treater this year and it was so worth it to see her skipping along down the sidewalk, proudly showing off her costume, lifting the trunk and trumpeting. I wish I had more pictures of her wearing it but she was much too excited to stand still for photos! (The pattern I used for this costume was also found on Etsy, and it was McCall's 8938, a 1990's Tom Arma deal. It looks impressive, and while it did have more hand-sewing than I would've liked, it was actually quite straightforward to put together, especially if you're experienced with sewing from commercial patterns, as I am. It was also nice that the only pieces that had been cut in the pattern were the elephant pieces! It saved me a lot of time!)

I highly recommend buying vintage and used sewing patterns from Etsy (or eBay). Even by the time you pay for shipping, it's usually a savings over buying a new pattern at a craft store, and it's my opinion that the older patterns (especially pre-1980) are really a lot better in almost every way. They don't cut corners the way many contemporary patterns do. I think sewing from a commercial pattern is really the best way to learn to sew well, to learn techniques that you otherwise wouldn't, and to learn the hows and whys of garment construction. 

fiona's in the center

We had a completely fun and delightful Halloween in every way this year. Although I haven't talked about it very much here, I still don't feel completely settled or "home" in our new house. I think it's just because of the sheer amount of work we've had to put in and the amount that still remains to be done. But spending our first holiday here felt like a chisel knocking away some of my reluctance to feel settled. Home. This is home. I'm amazed and glad in my soul.

Some baby things

My sister's baby boy was born last week. And of course I made him a lot of presents, just like any good crafty auntie should. Of course, the time spent making the gifts was not reflected in the time spent photographing them, which was done on our way out to soccer before gifting them. The color is kind of bad in these, which is unfortunate. Anyway.

I had something very, very specific in in mind, and I'm so excited that it all came together just as I would have hoped! 

IMG_1713

IMG_1658

IMG_1650

The "main" present (in my opinion) was his little sweater. The pattern is Beyond Pueperium by Kelly Brooker, and let me tell you, I absolutely loved knitting it. I want to make another one but don't have anyone else to knit it for. Maybe my baby nephew will get another in the coming months....

IMG_1707

IMG_1726

The yarn is Malabrigo Rios, which I love to knit with. So soft and lofty, and superwash, too! The buttons are something I picked up last-minute at JoAnn but have some interesting foil backing so the look a little "crackled". Although I wasn't sure what I wanted to use for buttons, and really went back and forth a lot about it (hence the last-minute), I was actually really happy with how these worked out.

IMG_1700

IMG_1709

To go with the sweater, there were two different initial shirts for him. One in a smaller size to fit him now, with the "little n", and one that should fit him through the fall, with the "big N". I even had a very specific fabric in mind for the appliques, something I'd had in my stash at some point, but for a while thought I'd given it away during the move! Fortunately, I did still have it, which was a huge relief and I think angels even sang when I found it.

IMG_1734

IMG_1732

The pants are made of some organic cotton jersey, which I love. I actually hoped to find something light blue and maybe pinstriped, but that apparently doesn't exist, so I settled for this lovely ocean blue and I'm so glad I did. What a perfect compliment to the sweater. 

IMG_1720

In addition to this outfit, which was the "main" gift, I also found this firefighter knit fabric (in my search for the original idea of light blue pinstriped knit), and I had to pick up a little bit because the baby's father is a firefighter. It quickly became some pants, and I added the dalmation applique to the onesie to tie it together. (An old Heather Ross print that I hoard for only the most special of things.)

IMG_1751

IMG_1745

We also couldn't leave his big sister out (wasn't I just making baby gifts for her?!), so she got an inital shirt. She told my mom that it's her favorite shirt and that she's going to get some money and put it in the pocket to save for the ice cream man. So sweet. 

IMG_1740

Such sweetness in these days with new babies in the family.

28 November

{I'm sorry this post didn't show up last night, I guess I actually just hit "save as draft" instead of "publish"!}

tooth1

The big exciting news that I alluded to last night was that James lost his first tooth yesterday! None of us (not even him) noticed it was loose until sometime in the middle of last week, and by then it was very loose. Everyone was so excited!

By last night, it was so wiggly that he didn't feel like he could brush his teeth comfortably, so he asked me to pull it. I haven't had to pull very many of Elisabeth's teeth (maybe one or two of the 15 she's lost), so I felt a little uncertain about how it would go (would it hurt?), but it just popped right out! So I guess it was time!

tooth2

The Tooth Fairy arrived last night with a gift of a tooth pouch, just as she had for Elisabeth, and her customary note in "curly letters" (handwriting so very different from mine!) I hadn't quite anticipated him losing his tooth on that day, so I didn't have the chance to go buy some unfamiliar fabric for his pouch. I had kind of a lot -- over a yard -- of this (I'll have to go check the selvedge later to tell you what it is ... I've totally forgotten) stashed away in a forgotten sack so I figured they wouldn't have seen it downstairs in my workspace, and it was masculine enough that I decided to use it. The one downside is that I won't be able to use this lovely fabric for anything else now! (My kids are very observant.)

This pouch came out too big but it was kind of thrown together without measuring! Oh, well. I don't think anyone minds. 

What an exciting milestone! I have to say, all the "firsts" of my children just keep getting more exciting over time, and with each subsequent child. Maybe it's because there are more people to be excited about them! I don't know, but it really just keeps getting better.  

20 November

helen's dress1

Also for last Christmas, I made this dress for my little niece. It was actually a design I'd had in mind for a couple of years (originally, I'd thought of making it for a friend -- who is James's age -- when she was two or three), but it took me a long time to get from the idea to the making.

The pictures are just awful, taken moments before wrapping it up, and you can see the imprint of my ironing board on the fabric. I wanted to get some better pictures with my niece wearing the dress, but in reality, I don't think she ever wore it. People have such different taste and one lesson I've learned is that you have to let go of things when you gift them. You can't control how a gift will be received, whether it's a handmade Christmas gift, or even the gift of parenting a child to adulthood. You just have to let it go, know that you gave your best, and let them choose how to receive it. So, no hard feelings on the dress.

helen's dress2

helen's dress5

Anyway, it's a very fine-wale, lovely deep green corduroy; so soft. I used a vintage dress pattern (I'm sorry, I don't know which one, but there are tons of little empire-waisted vintage dress patterns out there) as a basic shape for the pattern, and then I made a few changes, primarily to the front of the dress, with the asymmetrical pleat. This was the particular design element I'd had in mind for the dress for years, along with the three buttons on the pleat. I added a pink turtle applique (Kaffe Fasset Paperweight print), and then vintage buttons down the back. I wanted to do the back closure differently, with a placket, but in the end, there was some reason (I can't remember) why I ended up going with buttons all the way down the back. I also finished the inside of the armscyes with that hideous brown bias tape, because I didn't have any other on hand and didn't feel like making self-bias binding. (I did make this on Christmas morning ... there were time constraints going on.) I hoped the dress would look cute with a long-sleeved t-shirt and tights under it, so of course, you would never have seen the bias binding. 

helen's dress4

helen's dress3

Anyway, I was really happy with the overall look and design of this dress, and very pleased with many of the small design elements. I wish that better photos existed of it, but as I said, some things you just let go. And, truly, I'd rather that than buying a pile of plastic toys that will end up in a landfill in a month or a year. I really am glad I unearthed these photos tonight, though. What a fun little dress to dream up!

17 November

In the interest of catching up, I have a few Christmas gifts that I completed last year (all at the last minute, true to form) to share with you, before this Christmas rolls around.

Last year Allegra and I had some good times on Facebook counting down the hours and ticking off our progress. I was doing hourly progress reports. It was fun. Although, maybe not the kind of fun I want to replicate this year....

Anyway, last Christmas Eve, I sewed these three items and completed a couple of other projects (more on those in upcoming posts). 

christmas gifts last year1

For our great nephew (oh, my, how hard it is to say I'm a "great aunt" at age 33 [aren't they usually about 85?]. Well, I was actually 31 when this baby was born, but anyway, yes, my husband's oldest brother has a grandchild....), I made this cute applique initial shirt. A simple gift, but applique stuff is always so well-received. 

christmas gifts last year4

christmas gifts last year5

For my sister's oldest step daughter, I made this tote bag, which was intended to be for her piano music, although she has since stopped taking piano lessons. But purple is her favorite color, and Elisabeth still gets so much use out of hers, so I'm sure it comes in handy. The pattern is the Ballerina Drawstring Bag (really a tote bag) from Simple Sewing with a French Twist (this was the second time I've made this bag; the first time was for Elisabeth's 5th birthday). I really like this pattern. It comes out looking very finished and professional for not a lot of work.

christmas gifts last year2

christmas gifts last year3

For my sister's younger step daughter, I made another Simple Tote from Bend the Rules Sewing. The last one I made went to her older sister (the one who got the purple tote this time) years ago, and I'd been hearing rumors that the younger sister wanted her own, so she got one! I totally love this red kitten fabric! 

Altogether, these were easy, relatively quick gifts that all come out looking pretty polished. The best kind of gift, I think!

(Though I wish I had better pictures, but this is what one gets when one procrastinates until Christmas morning to take the photos immediately before wrapping them. Hmmm.)

Arr, tharr be pirates, ye scoundrels!

halloween1

My kids have been really into pirates for what seems like ages now (probably more than a year). James has been drawing treasure maps on every piece of paper he can find (carefully "authenticating" it by crumpling and tearing, as well). About six months ago, we had the opportunity to see real pirate artifacts (and even touch some of the only pirate treasure ever recovered) in this fanstastic touring museum exhibit. After that, the idea of being pirates for Halloween was pretty much determined. (How much do I love that we are still on the matchy-matchy costumes?)

halloween2

(I hate that I have to do this, but a disclaimer: we do not glorify piracy or the actions of real pirates, past or present, in our house. It is a fantasy character, plain and simple.)

halloween6

I think it's interesting to observe how the popular image of what a pirate looks like has changed since I was a little girl. I realized, as we were out trick-or-treating, first in our small downtown's trick or treat street, and then later in our own neighborhood, how much the "look" of a pirate has been influenced, for better or worse, by Captain Jack Sparrow. I think that even children who haven't seen the movies (as I presume most little ones haven't) think of a pirate as looking that way, with the belts and the sash and the rings and so on, as opposed to my childhood image of pirates, which was perhaps a bit more Mr. Smee in nature. Anyway, when we began discussing what costume elements were absolutely necessary in the pirate costumes, the first things to come up (besides the hats, which we already had in our dress up bin) were the belts and sashes.

halloween17

{blurry, but I couldn't resist the leaves!}

These costumes were the easiest I've made in my Halloween costume-making career (which is quite extensive -- these brought my costume-making tally up to 19!!). I only had to sew the shirts and the vests. (Fiona didn't get a vest because, frankly, I didn't think it would have much dress-up play value and didn't seem absolutely necessary. She certainly didn't care.) I tore the fabric for the sashes, and we got pants and belts at the thrift store. They also each wore a couple of rings. Elisabeth had one costume ring, but the rest of the rings were fashioned with large buttons and pipe cleaners!

Altogether, these costumes were easy and very fun. (And cheap! We only had to buy the striped fabric for the sashes and thrift the pants! Everything else was made from materials or items we had on hand.)

halloween13

{a bit of pirate attitude}

Details:

Shirt "un-pattern" here. I used an old sheet for Fiona's shirt, and some muslin I had in my stash for Elisabeth & James's shirts. I did the collars and cuffs slightly differently on each shirt, and can't really say which turned out best. They're all different, I suppose.

halloween15

Vest "un-pattern" here. I didn't love the way I drew the bottoms of my vests, but I threw them together at the last minute because the kids decided after trying everything on with the shirts that something was missing. I wish I had taken a bit more time with the vests, but they look fine for Halloween costumes. I used the idea suggested on the Wee Folk Art site to make it seem like there is a missing button. I tied some string on the button side and the buttonhole opposite it is non functional. Elisabeth's vest was made out of some corduroy I'd had for several years and James's was made with some linen that I got for a song years ago, as well -- I had maybe 10 yards of it just going unused! What an odd purchase. They are both lined with this fantastic, funky vintage fabric that I got from Jodi, also ages ago. (I need to get some pictures with the lining showing, it's so great.) The buttons are some random "brass" buttons I had in my stash, probably cut off of blazers at some point. Altogether, the vests are my favorite part of the costumes.

The idea for the rings out of buttons and pipe cleaners was also from this site! It was very useful in fashioning our pirate costumes this year!           

Edited: Oh, gosh, and I almost forgot one of the best parts of this story. I sewed several of these costume pieces with a kitten sitting on my shoulder. That's right, mateys, I have a kitten parrot! 

halloween3

Once again, we were delighted to have fun, homemade costumes as part of our celebration. (Just a bit more about Halloween tomorrow, too!) What about you? What kind of costuming did you do this year?

Some Christmas knits

I know I promised to be here yesterday, but I had a headache (which I very, very rarely get, so I'm a big baby about them), and the day got away from me. 

On to some knits. I've alluded to the fact that my kids' "fall 2010" sweaters are now finally complete (only 6 months late....). I think I will wait to share those at the beginning of next week since they are my "big" knits and I hate to end a week with my best material. ;)

But I do have some other finished knits to share with you.

Last November, I solicited ideas from you about what to knit for our priests for Christmas. I ended up knitting a scarf for our pastor (who had gotten a hat the previous year), and a hat for the assistant pastor who hadn't been with us before. Some drama ensued (in my mind, no one else really knew about it until now, when I'm putting it out there on the internet....) when I saw the assistant pastor wearing both his hat and the scarf I'd knit for the pastor. My feelings were extremely hurt. However, I moved on. You can't control what happens to the gifts you give people, even if they are handknits, and even if the person to whom you gifted them means a lot to you and is, in your opinion, a sharp dresser (who should like scarves). I never actually found out why the other priest was wearing it -- whether our pastor didn't like it and just gave it to him, or whether the assistant pastor didn't realize whose it was and just picked it up out of the rectory closet, or what. Either way, it was being used and enjoyed and keeping someone's neck warm. Also, both of our priests were reassigned this year, and we are getting two new priests in mid-June, so there will be a new batch of hats, I'm sure. So, enough about my hard feelings, and on to the pictures.

For both projects, I used Malabrigo Rios in black. (By the way, I love the texture and loft of Rios -- I highly recommend it for a superwash!)

scarf1

scarf2

scarf3

The scarf for our pastor was the Professor's Scarf. It was so easy, quite fast for a scarf, and I love the look. I did use an entire skein and didn't feel like it was going to be wide enough, so I dipped into the second skein (which was for the hat), and still didn't get it wide enough. It turned out that the hat used less yarn than I anticipated, so I could have gone farther on the scarf, but I left it. It was fine, but I think a little bit wider would have been nice. (Ravelry link.)

hat1

hat2

hat3

The hat for our assistant pastor was this Irish Hiking Hat (I knitted a different Irish Hiking hat in 2009). I really loved knitting this and it's one I'll definitely make again, especially with new priests to knit for this year. (Ravelry link.)

A recently completed "Christmas" knit (a very belated gift) was for the teacher I had this year in the 4-year Catholic biblical school I'm in. I ended up giving it to her, wrapped in Christmas paper, at our final exam in May!

toast for traci2

toast for traci3

toast for traci1

toast for traci4

I loved my teacher, learned so much from her, and felt a real kinship with her: a fellow Type-A, melancholic, lover of pink. So I knitted her a pair of Leslie's Toast (how has it taken me so long to get on the Toast/Toasty wagon? These are fantastic!) in Malabrigo worsted (Cactus Flower colorway).

These were (obviously) very quick to knit, once I actually sat down to finish them. I did most of the work the night before my test, when I should have been cramming. I ended up getting a 100% on the test, though, so I suppose the last-minute cram wasn't all that necessary (despite the very real tension I was feeling at the time!).

They are also super cute and so very pink! Perfect in every way, in my opinion. (Ravelry link.)

OK, those are the knits for today. I'll be here tomorrow again (seriously!), and next week there will be lots of pictures of three very special cardigans. It's so good to be here!

Wherein we look at lots of pictures of a corduroy dress

dress

I sewed a new dress for Fiona last week or so.

back

It was fun to take an evening to sew ... I haven't had the chance to do it since right before Christmas, between sickness and busyness.

yoke

Anyway, I had the idea of a yoke dress like this, with a very high "waist" (where the skirt attaches to the bodice in the armscye rather than beneath it) for a while. This style doesn't seem as popular these days. I have a few vintage patterns for this style, but none in Fiona's size. So I just decided to make my own pattern and I'm glad I went for it.

back

It turned out almost exactly as I wanted it to. (I would make it a bit less full and with a larger neck opening if I did it again, but otherwise I love it.)

buttons

The fabric is a fine-wale corduroy from the fall at JoAnn. I used two small vintage white buttons but otherwise left it unadorned -- partly due to lack of time (I really needed a sit-and-finish project, if you know what I mean), and partly because I just wanted to experiment with a basic design and look. The back uses a continuous bound placket, which is now easy for me after my first struggle with it on the bird dresses.

smile

Although I just sketched out a pattern using basic proportions from some of Fiona's other clothing as a guide, I keep meaning to buy the master patterns from Children's Fashion Workshop. I think my clothing design skills would improve a lot if I used that resource to its fullest!

almost two

Someone is looking very two-ish to me these days, as we approach a big day on Saturday! (Wow, already?!?!?)

Anyway, this was a fun project to see to fulfillment -- from designing the pattern to sewing it, all in an evening -- and I'm really fantasizing about getting some more things made in the coming weeks! The best of all, though, was trying it on my wee one, and the joy of seeing her wear something that I had created just for her. That's why we do it, isn't it?

I almost forgot...

Oh, my! I almost forgot to post today!

Today we spent most of the day doing a deep cleaning of the house to prepare for the beginning of decorating that we'll do on Sunday (we gradually decorate all through advent).

cards

I worked on our Christmas cards for a little while. I plan to have them ready to mail on Tuesday, which means I have a lot more work to do over the next few days!

pie

And, another shot of yesterday's pretty pie, an apple-blackberry pie (which was not as spicy as the Michaelmas pie we've done in the past, but perfect for Thanksgiving).

Ruby and Lucy

Two more dolls to share with you today!

Ruby

Ruby

Ruby dress

Ruby trim

Ruby is fairly unique in this batch of dolls in that her dress and the trim on her apron are vintage. Most of the other dolls had new fabrics all around, and ribbon that was purchased in New York when my mom and I went about two-and-a-half years ago. Her hair is the longest of this group, down to about where her knees would be if she were a little girl! It's so much fun to do different things with their hair -- it's one of my favorite parts of dollmaking, actually.

Lucy

Lucy

Lucy dress

Lucy was an overall favorite from this group -- James and my mom both definitely had a great preference for her. James actually loved her so much that he begged to name her (what is it about this particular group of dolls? My children hardly ever even seem to notice the dolls I make ordinarily), and at that point, I hadn't come up with a name for her, so I let him choose her name. Lucy is also our dog's name, but I also know it's a great favorite of his, so it's really a sign of her specialness.

I have three more dolls to share with you next week, and (hopefully) some finished knits, too. I'm busy chipping away!

. . . . . . . . . . . . . . . . . . . . . . . . . . . . . . . . . . . . . . . . . . . . . . . .

Thank you for your kind words about my bad day yesterday. Today was really a better day but I was so rattled after yesterday that I'm afraid I was still in need of an attitude adjustment today. Hopefully this weekend we'll catch up around the house a bit, I'll get to rest, and my husband and I are hoping for a date night. :)

After that, I'm optimistic that things will slide back to normal. (Plus all the baking I'll be doing for the holiday! We get to go to two Thanksgiving celebrations and I'm kind of the pie baker, which I love.)

"Being an artist"

I said yesterday that I had eight dolls to introduce to you. A couple of them have not yet arrived at their destinations, and a lot of dolls in one post is quite overwhelming, anyway (I think). I also had some other thoughts on my life with dollmaking that I wanted to share with you. So today I'll share a few, and save a few for a couple of days from now. Today, I'd like you to meet....

Gwen

Gwen

Gwen dress

This sweet little blonde is one of my favorite dolls I've ever created. Something about her eyes, I think. And the purple dress and pinafore is one of my favorites, as well.

Violet

Violet

Violet dress

This doll was extremely hard for Elisabeth to part with. She was hoping that somehow she'd get to keep her, I think (which doesn't happen often!). She named her Violet -- normally I name all the dolls myself (their names just come to me as I'm working on them), and I actually had another name in mind for her. But Elisabeth was so enamored that I let her name the dolly as a concession. Violet lives in Australia now!

Brynn

Brynn

Brynn

Brynn dress

Brynn pinafore

Brynn lives a little closer to home, and actually belongs to a dear friend now. I was nervous about the color combination for the clothes (a favorite combination of my friend's, but I wasn't sure how it would work given the particular vintage red floral I was using), but I ended up loving it. (Hence the extra photos of Brynn & her clothes!)

Five years ago, if someone had told me I would become an accomplished Waldorf dollmaker, I wouldn't have believed them. They really seemed intimidating to me! But necessity is the mother of invention, and out of making my own children's dolls, something was sparked in me that I would never have expected, or dreamed of. I used to shrug off compliments to my work, but I've really come to embrace them over time.

Last month, I attended a fundraiser dinner where most of the attendees were part of a social group that I rarely encounter: middle aged, mostly in academic and business fields, many of whom weren't parents, or had grown children. The man I was sitting next to asked me what I do. Of course, there are so many answers to that question. But in that moment, I didn't hesitate to answer, "I'm an artist." He asked what medium I work with, and I said, "Textiles." And you know what? I felt really good about this answer.

Five years ago, I would not have answered in that way. But thanks to this blog, and all of you -- your support, your enthusiasm, your encouragement -- I am honestly able to say that I'm an artist. And that's amazing to me! No, I don't make a living, or really even pay any of our bills, with the few doll commissions I'm able to take each year. But to know that a piece of me, the work of my hands, a little bit of my own unique perspective and vision, is living on in the hands of some of you and your children, is a true gift to me. I am so grateful and pleased to be able to share a little bit of myself with the world in this way.

Thank you all for being here, and helping me to realize the dream of "being an artist". What a dream come true it is!

love,
Grace

A little peek

Only halfway through the month and I very nearly didn't post today ... it's a discipline, that's for sure! (I think last year I ended up switching from mid-day to evening posts and I think that may be more realistic for me this year, too. I think I may just say that you can expect evening posts for the rest of the month!)

Anyway, tonight I just have a sneak peek of what I'll be posting over the next couple of days. I just haven't had enough time for getting photos up and ready.

dolls

But, yes, I have eight completed dolls to share with you! I'm very excited to introduce them to you!

For prayer

Today I have something to share that I made, but it's not in the same vein as what I usually do.

Years ago, my parents bought me a fairly inexpensive rosary with opaque pink glass beads. Somehow I lost that rosary about two years ago, and last spring, I finally accepted that I would probably never find it. I looked around locally and online for quite a while, trying to find a replacement that I liked.

rosary1

Finally, I had my mind set on something so specific that I decided to make one for myself instead. I spent about a month gathering various supplies -- sterling silver wire, freshwater pearls, and pink coral beads (these are dyed coral; it's basically impossible to get natural pink coral beads anymore unless you can find vintage ones). I pulled out the jewelry tools that I hadn't used since I was 14, and began to make the links using a wire-wrapping technique.

rosary3

When it came time for the two prominent pieces, the crucifix and the centerpiece, I hit a snag. I wanted a centerpiece of Our Lady of La Leche, a title of Mary where she is depicted nursing Jesus. Unfortunately, those aren't really available anywhere. I tried to get someone to cast it for me from a medal that I wear, but that fell through. Finally, I ended up buying a pre-made Our Lady of La Leche rosary from the shrine in Florida, which had sterling silver pieces but plain glass beads. It ended up being an expensive way to make this rosary, but since it was about 7 months from start to finish, we didn't feel it in our pocketbook too heavily, and it was so worth it to me to be able to have a rosary that I had made, and was what I really wanted, as well.

rosary2

The crucifix I ended up using came on that same rosary that I purchased. I had looked at other crucifixes, but this one matches the crucifix on Elisabeth's First Holy Communion rosary, so I decided to use it.

rosary4

I am so happy with how this came together. It feels so good in my hands when we pray together at night, and its beauty reminds me to lift my soul up to the heavens.

His "hat back"

On Friday night, with the costume sewing behind me, I decided to try Melissa's Not-So-Big Backpack pattern from the most recent issue of Stitch Magazine.

backpack1

When I say that this came together like a dream, I'm not kidding. The instructions were extremely clear and easy to follow. There were notches on the pattern pieces! (I love notches. Have I ever mentioned that? Well, I do.) There was no guessing about seam allowance or supplies or anything else. Altogether, it took me about two hours and forty-five minutes to make it (from start to finish), but I sew pretty slowly, so I'm sure a normal person could crank it out in about two hours. That's my kind of quick project! I am super satisfied with this pattern, and this little backpack. One note: I did end up having to buy longer zippers and cut them. I used pliers to remove the zipper teeth at the seam line, and that was fairly difficult. I'm not saying it wasn't worth it or anything, but it took a fair amount of time to get the first on loose. Once I got one of the teeth free, the other few that I removed in the same area were much easier.

backpack3

James calls backpacks "hat backs". He's called them that for a long time, and it's one of the few stray "baby" phrases that he still says. I would like to hold onto it forever and ever.

backpack2

He is so excited about his new "hat back". He's been carrying it around all day, with all kinds of stuff in it (it may be not-so-big, but it can hold a good amount of stuff!), figuring out fancy ways of flipping it onto himself ... ah, the simple satisfaction of a new mama-made pack.

I'm excited that it came together so quickly and easily, and that he has ended up loving it so much. As a project, this is just the kind of winner I'm looking for!

Trick-or-treat!

Thank you for your sweet comments about our wild cat costumes! They were fun to make and much more fun to wear, I think!

Today, I have two more Halloween sewing projects to share with you. I have made each of my children's trick-or-treat bags, and this year I made one for Fiona and one for my little niece, as well.

fiona's trick-or-treat bag

Fiona's -- so perfect with the happy little kitties! I love the fact that the jack o' lanterns are sitting on steps with leaves falling, too.

helen's trick-or-treat bag

My niece's -- my sister chose this fabric from my stash (blue is my sister's favorite color)

handle detail

The ghosts have little sparkles on them!

all three bags

The bags measure about 10" wide by 11" high (not inlcuding the straps). (They are all the same size -- I don't know why James's, in the center, looks so much smaller in this picture.) When I made Elisabeth's (on the left), she was 18 months old and it was an easy size bag for her to carry. The added benefit was that it didn't hold too much candy (at least, that's what I thought). However, I've since discovered that these bags actually hold a deceptively large amount of candy and I wouldn't want anything bigger than these at all! (They might hold up to three pounds or so -- luckily we've never filled them up beyond about halfway, but also believe me that we have more candy in this house right now than any of us know what to do with!)

I have quite an array of Halloween fabric because I usually pick up a half-yard when I see some I like -- I always figure that there will be more trick-or-treat bags to make, if not for my own kids, then for someone. It was nice that I had everything on hand to make the two bags this year, because I ended up whipping them up at the last minute. (Hmm. No surprises there, I guess.)

trick-or-treat bags

Anyway, these are a quick little project, but sometimes quick projects are the best kind, don't you think?