Weekend Sewing

bow

First ~ wow. Thank you so much for all of your lovely responses to my last post. I am really, really behind on email, but I plan to respond personally to all of you who left comments or emailed me about that post. I know how important it feels to know you are not alone in these struggles, and I am honored that my words resonated with so many of you. I have gotten so much better at reminding myself that life is a process and at honoring my own needs -- for quiet & peace, for recognizing and appreciating how lovely daily life actually is. Blogging is a huge part of this for me. Both my own process of keeping a blog, and the inspiration I get from all of you. So, thank you.

it spins!

And now...

Last weekend, my husband took the children out for a day so that I could begin a deep clean and organization of my studio space (this tiny room is also where we change diapers and store James's clothes, where we keep most of our grown-up books and all of our sheet music, and our computer desk, so it gets really cluttered really fast), and have some crafting time on my own. I did get a lot cleaned out and organized, though I didn't get to organizing my fabric or paper crafting stuff. But it was a good start.

front

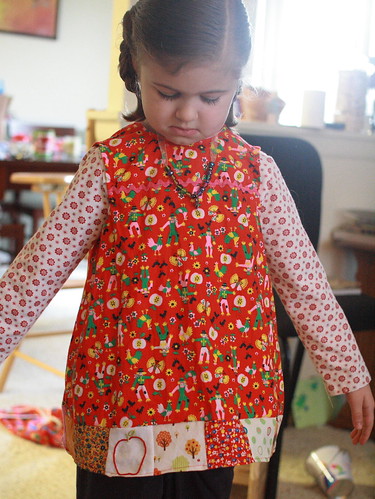
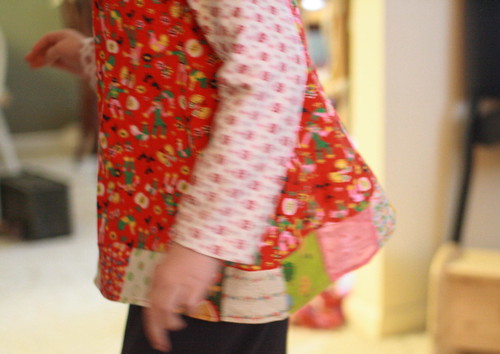
I had hoped to make a dress for Elisabeth and a new linen skirt for me, but the skirt will have to wait until another day (all that cleaning takes a long time, you know). Elisabeth's dress (See & Sew 4701) was really easy and the pattern was a cheap and spontaneous buy at JoAnn that morning (um, I went there for serger needles). I even did my first invisible zipper! (I suffered only momentary spatial confusion.)

invisible zipper

I was happy with the result. And Elisabeth? Well, she's worn it every day this week.

full length

Summer Skirt

Happy Midsummer Day to you all! In our home, we leave a little tea party for the fairies tonight. They have been very obliging with little gifts in the past, so we hope to be able to share them with you tomorrow!

Since it's now officially summer, I felt that I really needed some new attire befitting the season, and so I present the first of what I plan to be a series of at least five new summer skirts:

skirt again

I whipped this one out on Tuesday night, and added the ruffle in a bit of mojito-induced slap-happiness which kicked in when I noticed that the two fabrics coordinated perfectly. (Is inebriated sewing recommended? Don't answer that question ~ I assure you it is purely rhetorical.) By the next morning, I was feeling a bit of ruffle regret. But I think I like it now. So, not to worry.

ruffle

Then I added one of my most cherished vintage buttons to the waistband, for good measure:

button

Now all that's left for me to do (besides making the other four skirts, I mean), is to kick back, put my feet up,

feet up

and enjoy a bit of this:

a boy & his beagle

Happy Summer!

{Edited: The skirt "pattern" is a simple straight skirt with a zipper and button waistband, which I made using the instructions in Sew What! Skirts: 16 Simple Styles You Can Make with Fabulous Fabrics.}

A Quilt for Claire

on the bed

Elisabeth has had a little piggy bank since she was born (well, actually it was part of a game at my baby shower when I was pregnant with her, so it was actually before she was born), and although she doesn't have an allowance, we often give her change to put into her bank. Several months ago, she became really fixated on buying this doll bed for Claire, and since she had more than half of the money for it in her piggy bank already (five years of change, you know), we told her that she could buy it once she had the full amount in there. (I kind of cheated and gave her extra money from time to time.) She was very patient and never wavered in her resolve to save for that bed. So several weeks ago, she finally had enough change, and we ceremoniously brought the contents of her piggy bank to the bank to be counted in their machine. She is too little to really grasp the value of money, but she was so very thrilled to be able to buy this bed all by herself, though it doesn't matter to her if it was $7 or $70 or $700.

She was a little dismayed, however, when it arrived without the quilt, but more than satisfied when I told her that she could pick her own fabric and I'd make a quilt especially for her and Claire. I finished the quilt at the end of last week, and although it's not perfect (my first solo quilting project -- the big quilt with my mom having been set aside for the time being), she is so totally thrilled.

Quilt_embroidery Doll_quilt

(These two photos are showing up really poorly in my browser, but clicking on them takes you to their individual Flickr pages, where they look more clear.)

The embroidery image is from a little paper-doll-girl rubber stamp that I stamped onto the fabric (using a fabric marker to ink the stamp). The quilt is self-bound with the backing, which was my lazy "this-is-how-I-make-blankets" way of doing the quilt binding, and a mistake I will not be repeating. Then I just ran it through my machine for some quick stitch-in-the-ditch quilting, and voila! A quilt for dolly.

on claire

hello!!

embroidery

Hee, hee, I told you I'd be back pretty soon! I just can't keep away. ;)

I cannot thank all of you enough for your kindness, generosity, support, and encouragement over the last couple of weeks. It has really helped me. A lot. Words are really failing me to express my gratitude to all of you. Thank you again and again!

Updates, updates ... hmmm. Well, first, my husband took a job. It's nothing great, something he'll probably try to use as a stepping stone to something more desirable within a couple of years, but at least now we are in a position of knowing. We'll be fine, we don't have to move; he'll have a bit more of a commute, but he's OK with it.

Next, I still haven't sent my camera. My warranty expires in October, so I better send it before then! I just can't part with it, you know?

Anyway, I know I promised some time ago to share the last of the April birthday gifts. Please forgive the lighting on these ... it was one of those times where they just had to be photographed -- right before they were gifted, you know?

for our little friend

So, these gifts were for the first birthday of a very special little one. She's sweet C's baby sister, and was born just 5 weeks after James. It has been such fun to have these two babies so close in age and to see them grow.

The smock was made using a half-made dress (I'm thinking from the 1970's or 80's), the source of which I will talk more about soon. I designed the embroidery myself, after baby R's mama raved about the embroidery I did on Elisabeth's birthday pinafore. The doll is a very simple design which I made up myself. It is made using organic colorgrown cotton fleece. Lovely!

doll's face

I really, really wish I had taken some pictures of beautiful baby R with her gifts. She is really a gorgeous baby. Perhaps her mama (a blog reader!) will indulge me ... ;)

Pants

vw buses!

I am pretty sure that I can't be the first person to have thought of this, but this spring when I received the Mini Boden catalog, with the VW bus t-shirt, I immediately thought of the VW bus fabric by Heather Ross. Anyway, I mentioned that to my mom in passing, and she thought it was so cute that bought the t-shirt for James, and I made him these pants. It is probably a bit over the top to wear a VW bus t-shirt and pants, but, you know, the coincidence was too much fun for me to ignore.

pants

I also just had to add -- look who's walking! He started taking some steps soon after his birthday, but it was really in the last couple of weeks that he really took off. It's so much fun! My baby is a toddler!

running

I want to thank all of you who left encouraging comments or sent emails over the last, very anxious, week. We won't have any news regarding my husband's job until the end of this week at the earliest, but I will surely be on here right away when we know anything.

I also wanted to add, as many of you have asked and/or guessed, that Elisabeth's beautiful princess gown was indeed made by her friends' mother, my dear friend Laura, who is very clever and crafty, thank you very much. Especially impressive to me is that she adapted/drafted her own pattern for the dress, which is truly more stunning in person than even in the photos!!

Birthday Crowns

A large number of the Google-generated hits to this site are from those of you looking for birthday crowns in some form or other: patterns for birthday crowns, birthday crowns for sale, paper birthday crowns, handmade birthday crowns, Waldorf birthday crowns.

birthday crowns

So, I thought I'd share a bit of our Birthday Crown history. I originally got the idea of using a special crown on birthdays a couple of years ago when Gymboree had little plastic tiaras that had ribbons and the words "Birthday Girl" on them, so we ended up getting one of those for her and we used to set it out on the dining table the night before her birthday for her to wear throughout the day. It was always a fun surprise and way for her to know that it was her birthday, since she was so little and the passage of time wasn't very concrete. But as we've gradually decided to eliminate plastics from our home to the degree that we're able, the plastic birthday crown was donated, and I decided to make some of my own.

There are many people making and/or selling their own versions of felt birthday crowns; I imitated an illustration of a child wearing a crown on the cover of The Birthday Book for my design. I used plant-dyed 100% wool felt for the front, and plant-dyed wool-rayon blend felt for the lining (because the plant-dyed 100% wool pieces are not large enough for the entire lining). Using plant-dyed felt seemed very important to me for this project. Not only is it just lovely, special, earthy, and so appropriate for the significance of a birthday, but it is also thicker and stands up a bit better than a standard felt (even 100% wool) would. Edited to add: My favorite source for all of my felt is A Child's Dream Come True. I have occasionally purchased wool felt elsewhere. But for quality and consistency, I do prefer A Child's Dream Come True.

jj's crown

The ribbon I used came from two different sources. The ribbon on James's is just from JoAnn. I really struggled with ribbon for his, because I wanted it to be special and "regal", and not overly feminine or juvenile, since I'm hoping my children will wear their crowns for many years of birthdays. I don't love what I ended up with, but I think it will work well for him as he grows. It was much easier to choose ribbon for Elisabeth's, obviously. The ribbon I ended up using on hers is vintage, which I did purchase online, although there is a local source for vintage and specialty ribbon where I have gotten most of the vintage ribbon that I have.

Elisabeth's crown

And our Birthday Crown tradition? Well, we always set the Crown and the birthday ring (similar to this) at the birthday child's place at the table during the night before his or her birthday. We light the candles on the ring that morning at breakfast, and the Crown is available to be worn all day if desired. It is then packed away with the birthday ring for the next year; it's not a plaything in our home, although we do have other (similarly-made) crowns, which are for play.

Birthday pinafore

birthday apron

As I said previously, I had been planning to make a linen smock for Elisabeth's birthday for some time. When I saw this berry-picking pinafore last fall, I made my mind up to do a similar one for Elisabeth, especially since berry picking is one of our favorite family activities. Of course, knowing how much I like the cross-back smocks, I wanted to use that style again. (Elisabeth is refusing to allow this to be called "apron" or "smock", by the way, and insists that everyone say "pinafore.")

chest pocket

I had such fun designing and stitching the "E" embroidery on the front ~ it was definitely my favorite part of the project, and I still get excited looking at it.

I have been working really hard at making my sewing neater, straighter, & more careful lately (I've been especially motivated by this book in that area), making my backstitching and topstitching go perfectly on top of the underneath stitches, and so forth. Right now, I'm still what I would consider to be a "beginner", but I want my stuff to look handmade, not sloppy. I get easily frustrated, and have said many (many, many, many ... just ask my husband!) times how much I hate pinning and pressing and snipping threads ~ all the "extraneous" bits of sewing, right? ~ but I am trying to teach myself to enjoy even those aspects, and sometimes find myself muttering things like, "This is going to be the best pinning job I've ever done." I am not totally there yet ... enjoying the process of sewing (or anything, apparently) rather than just rushing through in anticipation of the "finished product" is challenging for me. But I'm getting better. I think the last few things I've made show my increasing attention to detail.

pocket

And I love this pinafore.

Smocktacular!

smock

Yes, I just said smocktacular. Wouldn't you?

pose

Although it really feels like a long time since the estate sale where I picked this up, I realized today that it really has been less than two months. I found it kind of balled up among the fabrics at the sale; clearly a project (I'm guessing it was to have been a long-sleeved dress for a 3- or 4-year-old originally) that had been abandoned long ago. It had bias binding around the neck that was ripped, and a large rectangle cut out of the bottom edge on the back. The sides were not sewn together. When I first grabbed in it the frenzy of the sale, I thought I'd use it for the fabric. But when I got home and looked at it more carefully, I knew it would be perfect smock for Elisabeth.

spin

So I washed it, ironed it, sewed new binding on, made a tie. And then it sat, and sat, in my fabric pile as I mulled over how to repair the rectangle cut out of the back. Then I bought a bunch of tree fabric from Superbuzzy, and it inspired me to try the patches across the bottom.

bottom front

So last night, I finally decided to go for it. I cut 16 3-inch squares and pieced them across the bottom with no rhyme or reason. I embroidered an apple onto one square. And then I just sewed it all together.

bottom back

And Elisabeth? Elisabeth was so very excited to wear her new smock to an art class this morning. 

dance

Yarn for the vest

Who needs a swift ...

I decided that this vest really was calling my name to knit for James to wear on Easter. (And many times thereafter, I'm sure.) I've been wanting to try some of the Cotton Comfort (80% fine wool, 20% organic cotton ~ yum!) yarn from Green Mountain Spinnery for a while now, but didn't have a specific project in mind until now. It's the yarn featured in the book, which made the choice that much easier.

blue yarn for vest

My wee ones and I had a nice time winding the hanks into balls yesterday (really, who needs a swift when you've got two little ones?!) Well, actually, I wound it while they played in it. It took a bit longer, with more tangles than if I'd done it alone, but really, where else would I rather be?

Who needs a swift ...

And the yarn is so yummy. I love that it has just enough cotton to give it that light feel, but the wool gives it beautiful stretch and drape. I haven't cast on yet (one can only do so many projects while sick), but I know I'm going to like working with it. I'm really excited! Now, let's see how fast I can be!

{PS: Thank you all so very, very much for your many get-well wishes over the last few days. I have determined that I probably do not have strep throat (my sore throat has been steadily improving), but I'm still quite sick. As many of you know, when mama is sick, it kind of seems to knock the whole family out. Fortunately, I don't seem to get sick like this very often, and my husband is extremely good in times like this. I am still optimistic that I can complete a skirt for myself by Saturday and manage to be the "photographer" for my sister's wedding party. Because, you know, just going and taking the pictures is not enough; I really need a new skirt for the event!}

a birthday book

two pages

In the tradition of copying great ideas, Elisabeth and I made a fabric book for James's birthday. (I am a firm believer in the "imitation is the fondest form of flattery" concept.)

doggy

Most of the photography is Elisabeth's; those that she did not take herself were selected by her, and she dictated the captions under each photo. One thing I learned in this process is that my sewing machine is not intended for quilting. However, it was great fun to select the fabrics, and though I haven't done very much sewing in the last ... well ... ever, it was exciting that some of the pages used fabric from things I've made for James, like the cushions from his high chair & a couple pairs of pants.

snuggling up

It was so cute when he'd see a picture in the book, and then look around the house for the person or object (or doggy) shown in it, and he'd just laugh, and look back and forth between them, and laugh some more.

my favorite two pages

These are my two favorite pages. Nursing is so very important to James & me; it is really a special time for us to connect, which I'm finding feels even more vital with this second wee one of mine. And do you see what Elisabeth had me write under the right-hand page? "This is you, and I love you." Awwww.

And, although these photos have nothing to do with the book, I really had to share them:

who says you can't have your candle & eat it too?!

He really loves grabbing those candles. Eeek!

utensils?! hands?! why waste my time?!

Because picking up pieces of the cake with his fingers would have been a waste of time. ;) He was so surprised when we all laughed at him for doing this, but then he bent his head right down to do it some more!

Oh, and I do have to recommend this cake recipe -- it's the Applesauce Cake from this book. Very wholesome, and oh-so-yummy. We have enjoyed this cake on many a first (and second ... and 30-something) birthday with friends. I really had to do an icing this time (second child and all), and since James & I are allergic to dairy, I did a Seven Minute Frosting which was beautiful and fluffy when I made it 40 minutes before icing the cake, and flat, goopy, and a bit marshmallow-y when I actually put it on. When the recipe says "use immediately", I think it probably means it. Oh, well. It tasted good. ;)

Happy Birthday, Sweet Friend

c's birthday package

Today is the sixth birthday of Elisabeth's first friend. We met C when she was 16 months old and Elisabeth was but a wee babe of three months. Her mama, along with two other women, formed my core of support in those early -- sometimes stumbling, sometimes jubilant -- days of motherhood. For three years, C and Elisabeth were the only girls in our collective growing brood. (Now a total of 10 children between the four of us -- 6 boys and 4 girls.) And at first, that 14 month age difference seemed huge. But the girls have grown together and I take such joy in observing their friendship.

c's birthday card

Writing this post is a whole flood of emotions for me. Both in the realization that this girl, this one-time baby, is a big six-year-old now, and in the sheer nervous energy left from this huge project, completed yesterday:

beautiful face

With this having only been my third doll to complete, it was still a learning process for me. But I came to love this doll as much as the others I made. In fact, parting with this doll, whom I lovingly dubbed "Frances" during her making, was a little tragic for me as I dropped Elisabeth off at the birthday party this afternoon.

"frances"

It was is a huge lesson in letting go for me. I am not just letting go of a doll, you know? Of course you know. I'm having to let go of all that crafter's anxiety: "Will my handmade gift be good enough? What if she doesn't like it? It would be like rejecting me! Or is it too much? Oh, dear, is this gift over the top? " etc. And then, there's that whole letting go of our children bit. You know, because they're actually growing up. Right before my very eyes.

doll's shoe

More about the doll. I used the vintage strawberry fabric from the recent estate sale, orange yarn hair in honor of our little strawberry-blonde friend, vintage shell buttons on the back of her pinafore, and vintage ribbon on her knittted shoes. (All other materials are new.)

doll's birthday crown

I also made her a birthday crown (100% wool felt, but not plant-dyed) to coordinate with the crown I knew C's mama was making for her this year. Not knowing what the doll's eventual name would be (C's crown has her initial on it), I just embroidered a strawberry of my own design.

You can see more pictures of the doll on my flickr page.

Happy birthday, sweet C!

Eating in style

This morning, I thought I'd opt for something a bit less "profound".

I'd had the fabric for these cushions waiting around for weeks, but finally just got to them last weekend. Poor James has been bumping his head against the back of the high chair long enough!

mushroomy high chair cushions

Basically, I just traced the seat and back of the chair, sewed them together with the piping (which is made using the blue, yellow and orange stripes on the bias) sandwiched between (I have to credit my friend Rebecca with a lot of this part because we were crafting together at her house and I kept "breaking" her sewing machine. Thanks, Rebecca!) Then I stuffed them with 5 layers of cotton batting (which is just cushy enough, I think. It is not like a real "cushion", but fine for eating. Enough to keep him from hurting his head!), and then couldn't decide how to "quilt" it all together. Machine quilting was out of the question -- it was way too thick for my machine -- so, I was thinking of just tying it with yarn, but I wasn't totally sure if that's what I wanted, either. I finally opted for the buttons. I think they look OK, but not perfect. Oh, well. I'm quite happy with these anyway. Who wouldn't be happy to get to look at this beautiful fabric everytime they went into their dining room?!

blurry high chair cushions

I don't really know what I was thinking when I was taking this picture, so I apologize for the blurriness, but you can see how I did the bottom cushion. I actually haven't added the buttons on it yet, but hopefully today...

Quilting

Quilt fabrics

This is the fabric for the quilt I'm starting with my mom. This is my very first quilting project, and her second. (She is a very experienced seamstress, though. And such a perfectionist. She is Ma Ingalls for the 21st century, I tell you.) I'm a bit intimidated by the project -- and it is to be truly my project because she is finishing her master's degree this semester, and so doesn't have a lot of time to do it with me, other than helping me get started. The pattern we're using is star at my window, a pattern my mom found at Quilter's Cache. And, it's going to be hand-quilted! Wow! I'm excited, but also a bit nervous. Here's my very first completed block:

First quilt block

Hopefully to be completed by this summer... We shall see. ;)

Hello, Ilse!

Hello, Ilse!

I had mentioned to Ilse a couple weeks before Christmas that Elisabeth would be getting a tiny wooden pig mama with three itsy-bitsy piglets in her Christmas stocking, and I wanted to knit these pigs for James's stocking if I had time in my secret crafting sessions (after the dolls, you know). Ilse was jokingly "pressuring" me to finish them, so I thought she'd want to see that I ended up making these two on Christmas eve. I wanted to do three piglets, but just ran out of time. Letting go is a life lesson for the crafty mama, I think. Or the crafty gift-giver in general, right?

Claire and Peter

I'm back. I'm mostly recovered from my awful cold. My camera, however, has had some sort of issue and is being sent on Tuesday to be serviced. So, I'll be posting about Christmas for a while yet. :)

Elisabeth, Claire, JJ, and Peter

We had the merriest Christmas ever this year. (In spite of my cold.) The children were delighted with their gifts, and it was a very mellow day. We made the (difficult) choice this year to stay home and have a "just the four of us" Christmas. I am so glad we did.

The children loved their dolls. Elisabeth has named them Claire and Peter, which I just love. I love that she chose such classic, old-fashioned names for them, and that clair means "light" in French -- so appropriate for a doll "born" at this time of year.

In my last, delirious post, I omitted much of the doll odyssey, and have been getting comments and emails with questions about them. So, I'll try to give a shortened version of the whole adventure.

I've wanted to get Waldorf dolls for my children for a long time. I made a Baba doll from a Magic Cabin kit for Elisabeth's first birthday, so I knew the basics of sculpting the head and so forth, but had never really pursued making or buying them. This summer, I was dreaming about these and these, and I finally decided to jump in and make my own. First, I ordered the 12" doll kit from Magic Cabin. Once I had the body stuffed and pinned together, though, I realized that I really didn't like the 12" size and decided to make 16" dolls instead. So I bought a copy of Making Waldorf Dolls, some more supplies, and started afresh. This was in August. I had their heads made and their bodies stuffed by October (having to do this all in secret, while in the midst of my depression diagnosis, slowed things down somewhat).

Peter's hair loops

Then came the hair. Oh my. The Hair. Claire's hair was not too terribly difficult. It took about 3 (post bedtime) work sessions. And then she was done, albeit naked. But then came Peter's hair. I am not exaggerating when I say that rug-stitching his hair, loop by loop, using pliers to pull the needle through, took more than 24 hours total -- maybe closer to 30. By the week before Christmas, I was really afraid I wouldn't finish on time. But my sweet husband stepped in and spent a lot of time with Elisabeth -- playing with her in the snow, taking her along on errands, etc., so that I could work during the day. (Thankfully, his semester had ended, so he was able to help a lot.) I finished Peter's hair on the 23rd and then made their clothes that day (except for Peter's sweater, which I had knitted several weeks before).

It was down to the wire on this project. But I got it done! And Elisabeth is terrribly delighted with Claire. James has shown some interest in Peter, but he's very little for this type of doll yet. (I know that a simple knot doll would have been the more age appropriate choice for his age, but you know how it is with siblings. Sometimes appearances must be kept up for the older sibling if for no other reason.) I'm just so proud of myself for completing something with my own hands that my children will have to play with for (hopefully!) a long time to come.

Is it time for bed yet?

Today is (or, I guess, more accurately, yesterday was) my husband's 39th birthday. (Before you start trying to figure it out: yes, we're 10 years apart.)

It's not just his birthday, however. It's also a Saturday night. So, instead of our spending the evening doing something fun and charming together, he had a gig. A pretty nice one -- it's his trio at a really great local coffee/wine place (much preferable to a smoky bar these days). Ah, the glamorous life of a musician. And instead of my going with him to his charming gig where he'll be playing jazz renditions of Christmas songs, I am home, sick, with two over-stimulated, over-tired children, looking at this:

Studio at 11:29pm

I love winter. I love winter holidays. I love winter holiday crafting. I apparently even love (or simply can't avoid?) working on deadline. But I am definitely looking forward to a long winter's nap come Tuesday.

I would, however, like to reveal the dolls that I have been working on and talking about to so many of you for, oh, months now. I finished them both today! Here they are, rosy cheeks and all:

Elisabeth's doll - face

JJ's doll - face

I am really, really loving them and so amazed that I actually completed the project. There were moments where I wasn't sure that I'd be able to finish them. But, thanks in large part to the help of my lovely, wonderful, birthday-boy husband, who was fabulous about keeping Elisabeth away from my studio this last week, I was able to get them finished. With a day to spare!

I will be signing off until after Christmas, perhaps until after the New Year if I haven't recovered from my cold by then. I hope you all have/had a wonderful holiday.

For Tara

Tara, Elisabeth & JJ

My best friend from college is expecting her first baby in January. She's in the middle of quitting her job and moving across the country as her husband begins a new job. Somehow, in the middle of all this, she remains creative, generous, and gracious.

We have not lived in the same state for almost seven years. I miss her lots, even though we have both grown and changed in such different ways over those seven years. I am so excited to see her stepping onto her own path of motherhood. It's hard to express to her how much having a baby -- such a small thing, in so many ways -- really changes everything. But I know that she'll be the perfect mother for her sweet wee boy when he arrives.

For Tara

She visited for a short time on her way to her new home, and I gave her these baby gifts. I made her a sling and a silk and flannel blanket (similar to these, minus the $60 price tag!). It's a bit hard to tell in the picture, but the flannel is blue and white striped (Elisabeth picked it out, and at first I wasn't too sure about it -- there was another flannel I liked better -- but it really ended up growing on me). I love the batik print I got (at JoAnn) for the sling -- so much so that I think I'm going to get some more for a summer wrap skirt for me!

Anyway, blessings to you, Tara: for your move, your birth, and your motherhood journey. xo

It's Advent time!

Advent stocking garland

First off ... the Advent stocking garland. I made this two or three years ago (it's troubling that I can't remember!) using this kit from Magic Cabin. The idea did not even cross my mind at the time that I could design my own! (I sometimes think I am better at following a pattern or recipe than inventing one for myself.) But I like the results, anyway.

I was working outside the home last year and the year before, in jobs that required me to be away during the night, and my dear husband had to be responsible for doing much of the filling of Advent stockings. Last year was really tough, and there was many a night that we almost forgot to fill them. So, this year, I resolved not to have that problem again. I have accumulated all of the gifts already, and put them into these bags that I whipped out in the last two days. We have been thinking a lot lately about the "footprint" we leave on this earth, and I just didn't want to use plastic or paper bags for this when I didn't need to, so I decided to sew some that we could reuse again and again, even though we're the only ones who will ever see them.

Advent goodies for calendar

Many of them have "coupons" in them for outings (seeing lights, a holiday performance, carriage ride, etc.), and there are some actual gifts: some Ostheimer figures (we're collecting the farm figures), locally-made ornaments for each wee one to get the day we'll decorate our Christmas tree, and some craft supplies for days we'll make holiday crafts (today it was decorating an Advent candle -- pictures later, I'm sure!).

(SouleMama has a post on Kiddley with even more suggestions if this idea appeals to you. I also added a lot of suggestions to the comments on the flickr page for the top photo.)

Our Advent wreath form - just waiting on a delivery of a fresh evergreen wreath we get from a friend.

Advent wreath

I haven't shown our nature/seasonal table here yet, and it's kind of in a state of transition right now (we had to move the objects to make room for our nativity), but here it is in its current state:

Seasonal table for beginning of Advent

OK, back to the decorating, the Christmas music, and the fun!

Christmas cards - ready to go!

ready to go!

I can't remember when I started mailing my Christmas cards on the last day of November. It was probably four years ago. We had gotten to a point where we were only receiving a small handful of cards each year, and it was disappointing to me because I like to use them as part of my holiday decor. So I thought that if I started mailing them earlier than everyone else, that I'd get more, and it worked! We got ourselves onto a lot more people's lists that way, and I'm so happy!

Making the cards in advance also reaps some other benfits, although they weren't apparent to me at first. One is, somewhat obviously, that it is one less thing for me to worry about doing during December, that much more time for doing other "fun" things. The other, even less apparent benefit, is that it helps to get me into the holiday spirit sooner.

completed

I had great fun making these cards this year. I really wanted them to reminiscent of nighttime, so I chose the navy blue paper and stamped the background in silver. I had a hard time choosing a matte color for the stamped Madonna & Child image, but finally settled on the dark purple and I think it looks great with the navy and silver -- both regal, and in keeping with the nighttime look I was hoping for.

I love fine art images for stamping, and this one, a detail from Madonna and Child with Saint Anne by 17th century Giovanni Battista Caracciolo, is one of my favorites.

I used a heat embossing technique to create the "crackled" effect that you see on the card above, but after making half a dozen of them, I decided to stop. I'm concerned that they will crack even more in the mail and fall apart when people open their cards. I was also going through clear embossing powder like crazy, and making 50+ 63 cards that way would've taken way too long and been way too expensive. But I did like the way those few turned out.

So, off they go, to 10+ 13 US states and three foreign countries (the farthest away is Thailand, if you're curious).

Enjoy!